Winter Damage to Mortar and Why Proper Tuckpointing Matters
With the new season upon us and repair calls starting to come in, we are seeing firsthand the damage caused by the harsh winter. Freeze–thaw cycles can take a serious toll on mortar, which is why proper tuckpointing is so important.
Failing mortar can occur for a number of reasons, but poorly installed mortar will almost always fail—even after just one season.
Keeping Things Clean
When performing repairs, it’s critical that the areas being fixed are properly prepared and cleaned. This ensures the new material can bond effectively and create a strong, long-lasting repair.
This includes:
- Removing all dust, debris, and loose material
- Ensuring joints are properly cleaned out
- Lightly misting the surface before repointing
Light misting is especially important because it helps the new mortar bond properly and prevents the existing surface from pulling moisture out of the fresh mortar too quickly.
What Material to Use (and What to Avoid)
Using the correct material has a major impact on how long a repair will last.
- Flagstone on a concrete base:
A stronger material like Type S mortar is recommended for durability. - Flagstone on a softer base (such as HPB bedding):
Polymeric sand is often the better option because it allows for flexibility and movement. - Brickwork:
The correct mortar depends on the age of the building.- Type N mortar is commonly used for most homes because it is softer and more flexible than Type S.
- This flexibility allows bricks to move slightly as the building shifts or settles, reducing the risk of cracking.
- Historic or older homes:
A lime-based mortar is essential.
These bricks are much softer than modern brick, and using a stronger mortar can lead to cracking and long-term damage if any movement occurs.
Why Caulking Mortar Joints Is a Bad Idea
Another repair method we often see is homeowners using caulking to fill mortar joints.
We cannot stress enough that this is not a proper solution for masonry walls or flat surfaces.
Masonry is designed to breathe, and caulking prevents this. It traps moisture inside the wall, which can lead to further deterioration of bricks, concrete blocks, or stone.
In severe cases, this can result in:
- Structural damage
- Crumbling mortar
- The need to replace full brick or block sections
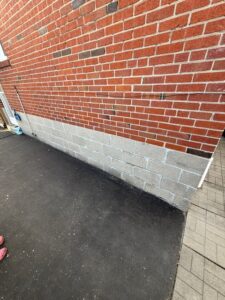
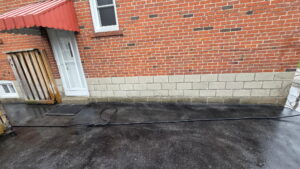
Real Repair Example
Take a look at the photos from a recent repair we completed.
The previous homeowner had used caulking to fill the mortar joints. We removed the caulking, properly cleaned the joints, and installed new Type S mortar to restore the structure and durability of the wall.
Matching Mortar Like a Pro
One of the best ways to make a repair look seamless is by properly matching the mortar colour. Adding colour to mortar can make the difference between a noticeable patch and a professional, finished repair.
At Murphys Masonry, we use high-quality pigments to match existing mortar as closely as possible. This allows repairs to blend in naturally with the surrounding brick or stone.
A trusted supplier we use for mortar colouring is Interstar, which offers a wide range of colours to suit almost any project. You can view their full colour chart here:
https://interstar.ca/downloads/charts/en/Mortar%20Color%20Chart_EN_web%202019.pdf
Weather Matters More Than You Think
Weather plays a major role in how well mortar performs and how long a repair will last.
The ideal temperature for installing mortar is between 10°C and 25°C. This range allows the mortar to cure properly and develop a strong, durable bond.
❄️ Cold Weather Risks
Applying mortar in freezing conditions can cause the water within the mix to freeze. When this happens:
- The mortar expands
- Cracks form
- The repair fails prematurely
🔥 Hot Weather Risks
When mortar is applied in very hot conditions:
- It dries too quickly
- Shrinkage can occur
- Cracking becomes more likely
How Professionals Handle Extreme Weather
There are proven methods to safely work in less-than-ideal conditions:
In cold weather:
- Use heated materials such as warm sand or water
- Add approved admixtures to help with curing
- Protect the work area to retain heat
In hot weather:
- Lightly mist the surface and new mortar
- Work in shaded areas when possible
- Slow down the curing process to prevent cracking
Summary
Combining proper preparation, the right materials, accurate colour matching, and ideal weather conditions will result in a long-lasting, professional-quality repair.
Attention to these details is what separates a simple patch job from a repair that truly restores the look and integrity of your masonry.
Check out our gallery to see other tuckpointing projects we have completed www.murphysmasonry.ca/gallery/
Serving the GTA and Surrounding Areas
We will continue to share updates throughout the season, highlighting the different types of mortar repairs we perform at Murphys Masonry.
If you’re dealing with damaged or failing mortar, we proudly serve the GTA, Hamilton, and Niagara Region. We’d be happy to assess your project and provide a free estimate.
Coming Next
Stay tuned for our next blog, where we’ll discuss brick repair and replacement, including when a brick can be saved and when it needs to be replaced.